Introduction
In this blog post, I’m going to go over how I deploy a multi-cloud Kubernetes cluster. But first, why do this?
I run Openstack at home in my basement. I do not own any UPS nor do I pay for dual internet connections. But, I have a lot of hardware that costs me less that $40/month in electricity. Considering power outages and consumer ISP outages can be devastating to an application I would like to keep running, I’m going to leverage some cheap cloud servers and the power/flexibility of Kubernetes to make sure a power outage does not bring down my application.
I have a Github Repo with all of my example code. Go look at it because I do not plan on putting a ton of code in here. Just enough to solve some non standard problems.
Outline
- Install VMs on Openstack at home, Openstack on Ramnode, and Digital Ocean. This will be done with Terraform.
- Create a Kubernetes cluster with these VMs. This will be done with RKE and Ansible.
- Solve some gotcha problems.
- Deploy your app.
- Profit.
VPN
How will these instances talk to each other? My homelab is all behind NAT and I doubt it’s good practice to have your pod network running on public networks.
Hey I have an idea! VPN!… Ugh… But now where do I host the VPN server? That’s now a single point of failure…
Enter Zerotier. What is Zerotier? It’s a peer to peer VPN. It requires a central server when nodes first get added to the VPN, but after that all traffic is peer to peer. This means I no longer have to worry about a single point of failure for the VPN.
Installing the VMs with Terraform
In a previous post on Immutable Infrastructure, I suggested using Terraform. Terraform will give us immutability on the VMs and will allow us to easily deploy VMs to multiple platforms at a time.
In this post, I’m not going to go over everything that is involved in creating VMs on multiple platforms. I will however, show you how I’m creating an Ansible inventory file with Terraform.
resource "local_file" "hosts_cfg" {
  content = templatefile("./hosts.cfg",
    {
      ramnode_workers = "${join("\n", openstack_compute_instance_v2.ramnode-worker.*.network.0.fixed_ip_v4)}"
      ramnode_masters = "${join("\n", openstack_compute_instance_v2.ramnode-master.*.network.0.fixed_ip_v4)}"
      home_workers = "${join("\n", openstack_compute_instance_v2.home-worker.*.network.0.fixed_ip_v4)}"
      home_masters = "${join("\n", openstack_compute_instance_v2.home-master.*.network.0.fixed_ip_v4)}"
      do_workers = "${join("\n", digitalocean_droplet.worker.*.ipv4_address) }"
      do_masters = "${join("\n", digitalocean_droplet.master.*.ipv4_address)}"
    }
  )
  filename = "inventory"
}
Looking at this, I’m doing a join with a newline at the end of each node. Here is what the hosts.cfg file looks like:
[workers]
${ramnode_workers}
${home_workers}
${do_workers}

[masters]
${ramnode_masters}
${home_masters}
${do_masters}
And after Terraform renders it, here is what my inventory file looks like:
[workers]
107.191.111.61
10.0.0.183
161.35.105.36

[masters]
107.191.111.187
10.0.0.137
161.35.14.32
Now, I have a working file to pass to Ansible!
Deploying Kubernetes
To deploy Kubernetes, I like using RKE (Rancher Kubernetes Engine). I use Ansible to template out the RKE config. So my flow looks like this:
Terraform -> Does the separate cloud stuff and creates VMs -> Outputs inventory file for Ansible
Ansible -> configures basic stuff on VMs -> templates out the RKE config -> runs RKE for you
RKE (run locally by Ansible) -> deploys Kubernetes and configures it to use the Zerotier network.
Here is what the RKE config (as an Ansible template) looks like:
---

ssh_key_path: {{ rke_ssh_key_location }}

cluster_name: {{ rke_cluster_name }}
ignore_docker_version: true
system_images:
    kubernetes: rancher/hyperkube:v{{ kubernetes_version }}-rancher1

{% if (longhorn_enabled is defined and longhorn_enabled | bool == True) %}
services:
  kubelet:
    extra_args:
      volume-plugin-dir: /usr/libexec/kubernetes/kubelet-plugins/volume/exec
    extra_binds:
      - /usr/libexec/kubernetes/kubelet-plugins/volume/exec:/usr/libexec/kubernetes/kubelet-plugins/volume/exec
{% endif %}
  kube_api:
    service_cluster_ip_range: 192.168.0.0/16

network:
    plugin: flannel
    {% if (kubernetes_network_interface is defined) %}

    options:
        flannel_iface: {{ kubernetes_network_interface }}
    {% endif %}

nodes:
  {% for node in groups['masters'] %}

  - address: {{node}}
    name: {{hostvars[node]['ansible_hostname']}}
    hostname_override: {{hostvars[node]['ansible_hostname']}}
    internal_address: {{ hostvars[node][kubernetes_ansible_interface]['ipv4']['address'] }}
    user: {{standard_user}}
    role:
    - controlplane
    - etcd

  {% endfor %}
  {% for node in groups['workers'] %}

  - address: {{node}}
    internal_address: {{ hostvars[node][kubernetes_ansible_interface]['ipv4']['address'] }}
    name: {{hostvars[node]['ansible_hostname']}}
    hostname_override: {{hostvars[node]['ansible_hostname']}}
    user: {{standard_user}}
    role:
    - worker

  {% endfor %}

dns:
    provider: coredns
    upstreamnameservers:
    - 1.1.1.1
    - 8.8.4.4

addons_include:
  - {{ rke_directory }}/cert-manager-namespace.yaml
  - {{ rke_directory }}/configs/cloudflare-updater.yaml
  - {{ rke_directory }}/configs/test-app.yaml
  - https://github.com/jetstack/cert-manager/releases/download/v0.13.1/cert-manager.yaml
  - {{ rke_directory }}/cert-manager-prod-issuer.yaml
The key pieces here, are internal_address being the Zerotier address for the node and up at the top flannel_iface is the Zerotier interface name. internal_address tells the Kubernetes nodes to advertise themselves with the address written. flannel_iface tells Kubernetes to run the flannel pod network over the Zerotier interface.
$ kubectl get nodes
NAME                             STATUS   ROLES               AGE     VERSION
multicloud-digitalocean-master   Ready    controlplane,etcd   2m47s   v1.15.12
multicloud-digitalocean-worker   Ready    worker              2m36s   v1.15.12
multicloud-home-master           Ready    controlplane,etcd   2m49s   v1.15.12
multicloud-home-worker           Ready    worker              2m41s   v1.15.12
multicloud-ramnode-master        Ready    controlplane,etcd   2m45s   v1.15.12
multicloud-ramnode-worker        Ready    worker              2m35s   v1.15.12
We now have 1 master and 1 worker in each cloud. You will always want a master in each cloud to make sure your api layer is HA. Workers are up to you. With my application at home, I deploy more workers at home because VMs at home are “free” and I have capacity. If my home “cloud” goes down, I make sure there are enough resources on the other clouds to handle regular traffic until the home cloud comes back up. Alternatively, I can scale out the other clouds easily with terraform.
Gotchas
There are two gotchas in this setup.
- You cannot use cloud block storage. Why? Because Kubernetes defines that storage cluster wide and expects all nodes in the cluster to be able to use that storage. Ramnode and my Home Openstack nodes cannot attach DigitalOcean block storage. This is solved by deploying Longhorn or another in cluster storage like Rook Ceph or whatever you like. My Github Repo uses Longhorn.
- What is the entrypoint? Enter Cloudflare (or another DNS provider with an API).
I wrote a quick docker image with a script that can update Cloudflare with my public IP address. You can see that here. I deploy that into a pod that runs on the cluster and updates Cloudflare with the public address.
Now, if a node goes down, the Cloudflare updater will move to another node in the cluster and update Cloudflare to point to its public address!
This trick even works behind a NAT. At home, I have a Public IP -> port 80 and 443 forwarded to haproxy -> haproxy load balanced across my kubernetes workers.
EXTRA OPTIONAL CONFIG: Because I’m using Debian 10, systemd resolvd is a little wonky at times with docker. This is why I added upstream dns servers in the rke config above.
Deploy App
I have temporarily deployed a test app for this Kubernetes cluster to https://helloworld.test.codywimer.com. This is reflected in the Github repo. I don’t plans on leaving it up for very long so I’ve included a screenshot.

Profit/Final Thoughts
Here is the final diagram for this multi-cloud Kubernetes cluster:
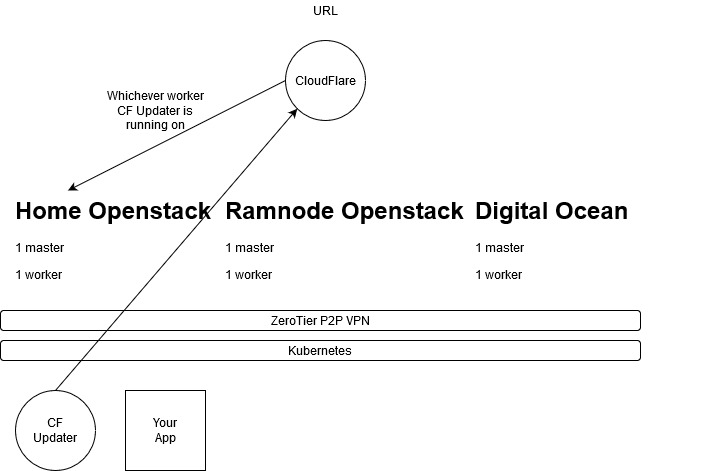
This setup will give you a highly available multi-cloud application deployment platform. At home, it provides me HA. In an enterprise, it can provide you flexibility and the capability to use cheap on-prem infrastructure for normal load and then (with more terraform) provides the ability to scale horizontally up and down with cloud resources.
IMO a hybrid (in house + cloud) approach to infrastructure gives you the best bang for your buck and gives you the most flexibility.
Happy Infrastructuring!
Jacob Cody Wimer